Brain Applied to Sax
The human brain can easily find new solutions to age old problems- just one
amygdala click away.
When normally dormant frontal lobes creativity circuits are accessed, unexpected superior
solutions come to light. Here is one such example below.
(Hmmmm... When else might alternative solutions come in handy?)
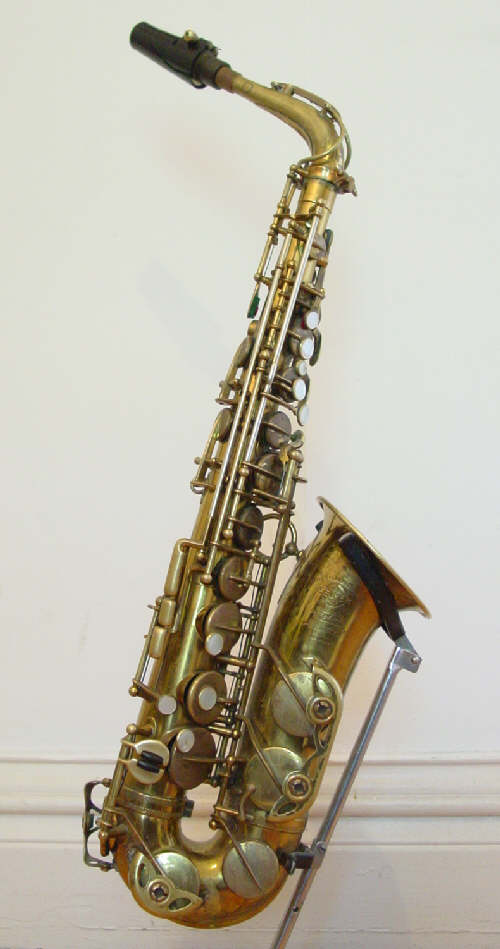
In 1973, I was a college music student looking for an alternative to replacing
the tone hole pads on my newly acquired alto saxophone, a 1952 Selmer Super Balanced
Action model (below). Traditionally animal product leather and/or calf skin pads were used for
this job. However, I was a dedicated tree hugging vegetarian and had reservations about
using meat by-products to make music. After a bit of asking around the music community,
Richard W. Johnston of nearby Boulder, Colorado came to my aid. He was
woodwind repair
genius who regularly was sent instrument rebuilding jobs from around the world, and he had
a unique proposal for my problem.
Mr. Johnston developed a new type of woodwind pad construction to solve the
problem of specific difficult water soaked keys that do not seal properly
on orchestral instruments such as bassoons, clarinets
and oboes, and he had made such pads for major orchestra woodwind players.
The unique pad material used in his design was closed cell neoprene rubber, used typicaly
in skin diving suits and
IBM computer padding. It's advantage over animal materials is that it is totally waterproof
and extremely
durable. Each pad is constructed of a layer of this material glued to a
backing of cardboard, the thickness determined by the individual key and its position on
the instrument.
Together we decided to re-pad my entire saxophone as an experiment to
see if this pad material would work replacing all of an instrument's pads- something never
before tried back in 1973.
The experiment was a resounding success. Not only did the pad material seal all of the
tone holes with excellent results, but the action of the saxophone was quieter and the
instrument itself resonated with superb tone with a measurable improvement over the
standard pad material response. Johnston, a master craftsman with decades of experience, was extremely satisfied with the results, remarking "This whole instrument vibrates when you play it now, quite incredible."
Listen to N.S. play this Sax
Subsequently, Johnston re-padded two of my flutes, a clarinet,
and a Selmer Mark VI soprano saxophone.
Normal leather, calf skin, and fish skin pads routinely need replacement every few years
or even more frequently. Incredibly, these neoprene/skin diver suit
pads from the 1970's have all retained their original suppleness, usefulness, and seal.
Incredibly, thirty years later, none have needed
replacement, and the pads work as well as when they were first installed, despite decades
of regular
playing
and use.
In 1999 I obtained a 1920's Buesher Soprano Saxophone (below) from Blinky's Antique Shop in Denver,
Colorado. The shop owner (actually Blinky the Clown of TV fame) recently had brought it
back having purchased it from the
original owner in a small Kansas town earlier that year. This time I performed the
overhaul and re-pad myself, with the same excellent
results as all of the previous horns. It just goes to show you what can be accomplished
when you are willing to
try something new.

ADDITIONAL DETAILS
PRINT OUT
The pad material used is closed cell neoprene-- the last time I got some, it was offered with a shiny
smooth version as well as a matte rougher skinned version. You need the shiny
stuff which will seal perfectly at the tone hole edges.
The shiny stuff is about $6-$8 a square foot at 1/8" thickness. I use
thinner material for the smaller pads 1/16" and 3/32" for my soprano.
1/16" will be too thin for any of your tenor pads, and you will mostly use
the 1/8".
If you have never taken your instrument apart before-- be CAREFUL. The key and rod
setup can be extremely confusing. Don't mix up the rods, keep everything neat
and lay it down the same order that it came off your horn. I warned you. don't
bend anything. If you have any doubts about your ability to do this- forget it.
One source for the correct neoprene is Denver
Rubber Company
--------------------------------------------------------------------------------
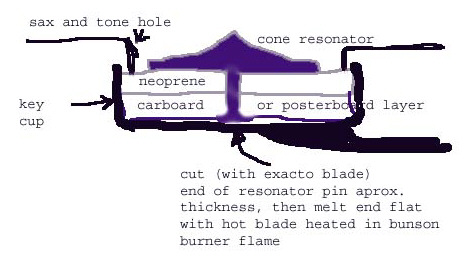
You will make pads based on the thickness of the leather pad at the seat
impression- the round circle that meets at the tone hole edge. When you
remove a pad from the cup measure carefully and eyeball this thickness.
Then construct a pad using layers of cardboard or poster board, with the
top layer being the rubber. Just ordinary quick dry all purpose cement or
contact glue will work. You can seat the pad in the tone hole cup with the
same cement- I have even used Elmer's glue for this as well.
The hardest part-- and this can be VERY VERY tricky and takes lots of
patience, is to make sure there are no leaks after the pad is in place and
he horn back together.
I suggest you make and replace ONE PAD AT A TIME. Disassemble, then do
another, reassemble, fix for leaks, etc.
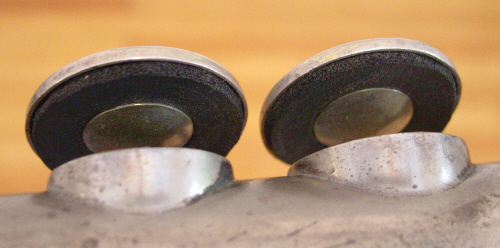
Also-- GET RESONATORS for your sax. these are plastic cone shaped inserts
that reflect the sound off the pad back into the horn and significantly
improve the sound. All the best horns have them. You have to get them from
Feree's music supply: 1-800-253-2261 You can tell them you need them for a
tenor- get the CONE shaped plastic ones- they sound the very best.
They are not too expensive, but you will probably have to buy more than
you need. Make sure the resonator you pick for each pad CLEARS the tone
hole-- if it barely fits, its too big, because often a key/pad will not
sit exactly center on a tone hole edge. Make sure you have a little extra
room around each resonator. fit resonators on every pad you can. Skip the
octave keys of course.
--------------------------------------------------------------------------------
You will need to make a leak light which goes inside the horn. Use a long
thin 12 volt fluorescent bulb or a VERY VERY bright incandescent bulb. Get
parts from the hardware store. The leak light has to be thin enough to
slide all the way down into the narrow end of your horn. I've taken apart
a small fluorescent lantern, and jury rigged the light to hang from wires
to do this.
--------------------------------------------------------------------------------
Turn off the room lights, look all around to see if any light escapes the
closed tone hole. If you see any light - BAD.
You must adjust
the tone hole cup/pad so no light escapes at all with regular pressure on
the key.
If you have made the pad the right thickness, it should sit on the tone
hole edge with minimal light, or no light, coming out the edge.
If you see a sliver of
light-- place a very thin knife blade (THIN blade knife, not a screwdriver
which will damage the tone hole edge) on the OPPOSITE SIDE FROM THE LEAK--
press done gently but firmly ON THE LEAK SIDE, remove the blade, and then
close the key again. This will adjust the angle of the key cup so that the
pad sits flat on the tone hole edge all around. It make take a few tries
till you get it perfect. You might shift the leak to another side--
practice makes perfect.
You have to check every pad this way. If the leak is too big-- you have
made your pad too thick or too thin. Start again and adjust the thickness
of the pad by removing some of the poster board layer- you can usually
peel this away-- or add a thin layer of paper or board to make the pad
thicker.
Pads up to 1
inch diameter are best cut out with a leather punch set. The only set I
know of is a Maun Wad Punch Kit Imperial
It is ESSENTIAL for
this job. Use it on a very soft wood surface so you don't damage
the edges of the punch rings.
The larger pads over
1" (many on a tenor) must be cut out carefully with a scissor.
This is impossible to do with a scissors and get
a nice round pad for the small pads. Get the punch, absolutely.
Also very handy
is a much more common smaller hole punch for punching out the center
hole to put in the resonators (there is a 1/8" inch pin that
--------------------------------------------------------------------------------
This is a BIG job which takes lots of coordination, dexterity, and
patience, as well as the right materials. IF you are up to it
however, you will have a superior sounding horn, with pads you will never
ever need to replace as long as you live.
Almost nobody knows about this procedure, it comes as no surprise your
typical repairman has never heard of it. But it works better than
anything. Often evolution of this sort takes decades before everybody
catches on. And of course, using neoprene pads will put a lot of horn
repairman out of this kind of job, as well as the pad manufactures. Nobody
is rushing to change. although the pads will never wear out- you will
periodically have to check for leaks, just with any other normal pad, and
adjust.
HAVE FUN!
Neil
Back to The
Library From Another Dimension
Back to Neil Slade's Amazing Brain
Music Adventure
|